Sunday, December 16, 2012

Sometimes you've just got to pay a guy to do something

So much has happened around here.  I'll start with something easy.  Something we paid a professional to take care of :)

Tree removal.  Don't try this at home kids.

We had an estimate from one local tree removal service of over $3000 to remove the ash and pine trees from our yard.  So we tried another service.  That one came in at $2400, which we were considering.

Then John came home and told me a guy from work had a tree removed really cheap by someone (who is insured) with our same last name *light bulb* this is when I remembered a recommendation from my uncle Pat about a guy who was insured and cheap.  Same guy.  So fate intervened and we called him.  Two days later and for $800 (1/4 of the original estimate and 1/3 of the second estimate) the trees were gone.  Whew.

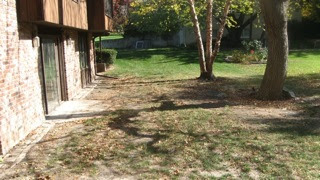
We removed the ash tree because of this:


There. On the far left...

See how crooked it is?  It leans
toward the house.


Maybe this angle is better?
Trust.  It was pretty scary.

We were so scared that one ice or heavy snow storm would send the tree crashing through our living room ceiling.  It's such a relief to have it gone.  I felt so bad taking it out, but it had to go.  The man who came and ground the stump said it was really rotten in the middle, so I don't feel too bad about taking it out since it would probably have to be removed soon enough anyway.


Here is what was left... 


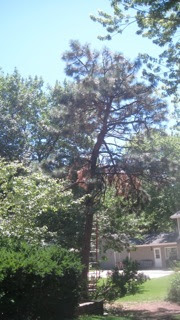
Now the pine tree...


It was also a leaner, however it was
leaning away from the house.

This did not make it any less ugly.


The pine wasn't rotten.

Just crooked, and mostly dead. 


Here is a direct quote from tree removal estimator #2:  "I don't know of anyone who would want that tree in their yard".  It was that ugly.  Poor thing, I'm sure it was magical in it's heyday.  But since it was 75% dead and 100% ugly, it went.

We also removed a dead dogwood tree that was planted close to our front door.  We did that one on our own.  It had some storm damage and never recovered fully, so away it went.  Since we took that one out ourselves (it was smallish and in a safe place for us to set up ladders)  we've been able to enjoy it in our fireplace for a week or so.  

Next update, staining the bar cabinets.


Saturday, December 15, 2012

New name!

I never got on board with the Brass is the New Black concept, so this is what I'm doing about it.

I didn't think we had done a lot around here since the soul-sucking deck project, but it seems as if we have.  I accidentally deleted the "to do" list in the sidebar, so I'll have to rely on memory to re-create it.

Once that is done, I'll go through the camera to see if I actually took pictures of projects (don't hold your breath...) so it may be a house cleaning type of post where we have a moment of quiet reflection and then move on.

Ta ta...

Thursday, July 12, 2012

The DECK - Part 6: Done!

Whew.  It's over.

There was a short break of the 95+ weather (only high 80s) for a couple of days and we pounced on it.   In the last 3 days we've:  built the arbor/trellis, scrubbed and sealed the deck.  And that, my friends, means we are done.  This time really done too, no little lingering tidbit (*cough* skirting *cough*).

The arbor/trellis took a little while longer than we thought, here's why.  Indecision.  We got hung up on how to attach the support girder boards without extra hands, a little stuck on the spacing of the boards, and finally which board was the best looking and where to put each board to maximize its beauty or minimize its faults.  You know, just stuff that when you add it up makes stuff more frustrating than it should be.  But that's home improvement, you snipe at each other and mutter under your breath, put your head down and work, and then before you know it you have a lovely arbor above your head :)


Problem #1:  attaching the support (girder) boards

We thought it was going to be really hard to hold up the 2 support (girder?) boards and attach them to the posts.  But it wasn't.  John is such a master of measuring twice and cutting once that these went up relatively easy.  But then we ran out of washers for the lag bolts.  And then I realized that the zinc ones we already used may bleed and make the cedar posts look bad, so then we had to drive all the way to Menards to get stainless steel washers, and then we had to come home and take out the bolts we already attached and replace the zinc washers with stainless.  Yada, yada, yada...  it sucked, but we (mostly John) got it done and we were ready to move on.


Yay! 

Let's just say John wasn't too happy with my "help" at this point.  Then it got worse...


Problem #2:  how to space the overhead boards evenly.

Originally there were 16 overhead boards.  We'd scaled down the size of the arbor a bit and figured 12 overhead boards would be about right so it wouldn't feel claustrophobic out there.  Then we pondered how to space the boards so they looked right attached to the house and overhead.  In a moment of "why is this so hard", I walked over and said "3 boards here, 5 here & 3 here" and then we stepped back and realized that yes, 11 boards are better than 12 and that was the perfect spacing.   So we sanded the boards and were ready to attach them to the house.


Finally ready for action.

But wait...

Problem #3:  which board goes where

We are finally ready to attach the overhead boards to the ledger board on the house.  And John was ready to lock me inside.

Side note:  the ledger board was another time sucker - me and my "how much overhang is this side going to have vs. the other side" and "shouldn't these boards be the same length on each side" and "that board is kind of ugly isn't it?" bullshit.  John was so patient with me, I know he wanted me to go inside and leave him alone and I think he only said that out loud once :)

However, my bullshit continued.  I went outside to help with the first board and wouldn't you know it, it was really ugly and I didn't want it right over our heads so we'd have to look at it every time we were sitting at the table and asked John if we could use another board.

Now John doesn't get mad that easily.  And certainly doesn't show it when he does. This particular situation comes as close to John getting mad as you are going to get.  I knew he was about ready to lose it, but I stuck to my guns and hoped he would understand that I didn't want to do all this work and then step back and be sad that we didn't take the extra 10 minutes to figure out which board went where so we weren't looking at crap for the next 30 years.  That's all.  I walked away for a moment and he got a nice cold glass of tea and we were able to move on and attach the boards.  And they are perfect.

Here ya go..


See the left side?  That's where I didn't want the extra amount of
ledger board just floating out there with nothing attached to it.

Maybe you need to see it in person, but I'm right. 


Anyhoo, here's a nice before and after comparison.


Before


After 


So beautiful.

Not sealed yet.
That's next.

Now cleaning and sealing the deck certainly are not difficult tasks, just really time consuming.  We cleaned the deck boards and sealed the arbor on a Tuesday evening, and sealed the deck boards and steps Wednesday evening.  And Thursday morning we woke up to this beauty.


Here's before.


During. 


And DONE.

There are no words.

Just relief. 


Before.

Wow, just wow. 


During.

Those were some dark days.

Kidding, but looking back they kind of were. 


And after.

It's breathtaking.
To us at least.
 

Now since this is the final (and longest) post about the deck, here's the budget breakdown...

Decking:  $1930.07
Arbor lumber:  $359.46
Other lumber (this includes new joists/supports and steps): $1069.96
Hardware (screws, joist supports, misc):  $414.91
Spindles:  $157.41
Rolloff:  $153.43
Cleaner/sealer:  $82.20

GRAND TOTAL:  $4167.44 

Not bad for a 500+ sq. ft cedar deck with a new arbor and steps.  We'd budgeted 5K, so we're in the black baby!!

Actually, we have one can of sealer to take back so you can really subtract about $25 from that total.  But I'm sure we spent that much and more on extra beer and takeout so I'll call it even.  

Throughout the entire process I was terrified that someone was going to need a trip to the ER.  At this point, I think I can safely say that the danger portion of the deck is finished and not one injury to report.  We had many splinters and jammed fingers, but only one minor spill through the open joists (thankfully the portion of the deck that is only 2 feet above the ground, not the 12 foot high portion) which resulted in this beauty...




Wednesday, June 27, 2012

The DECK - Part 5: Not done yet...

I'm going to own up to the fact right now... we haven't finished the arbor/trellis yet because it is really, really HOT around here these days and motivation is really hard to come by when you are faced with near life threatening heat vs. staying inside and waiting for cooler weather.  Don't judge us.

But of course we didn't stay inside, that would be silly.  We just relocated to the garage with fans set up and built ourselves a lovely outdoor dining table from the cedar left over from building the deck.

Backstory.  John is a math teacher.  Thus, he is the go to guy around here for figuring out how much of whatever material we need for projects.  At least once a week I'm asking "how many feet is XX inches" and he just knows.  Impressive.  However, I'm pretty sure that Sam and Will would also just know, so without taking anything away from my wonderful family, I think I'm just not as quick with the math as they are and since someone is usually around to answer my questions I fill my brain with other stuff.

Learned helplessness.  Try it sometime.

Moving on.


Needless to say, John figured out how much decking to buy.  And wouldn't you know it, he was off by just ONE board.  And, it was an extra board so we could take it back and get some $$.   But what to do with all the extra cut off pieces?  Why, build a table of course.

Here is how it went down.


First we figured out how big we could make it with what was leftover.

It's 3.5' x 8.5' 


Then we ripped down some salvage from the old deck
for the skirting part of the frame.


Then we added more reclaimed wood for
the internal structure.

FYI - This is the underside of the table. 


Then we added legs and cross support along the bottom,
which also acts as a wonderful footrest.


After we squared it up, we added 3 of the 4
 side pieces for easy assembly.

This also eliminated the surprise factor at the end
of the middle pieces not being the right size, etc..


Then we cut and attached the middle pieces,
then attached the final side piece and...

IT'S DONE!!


And, because I'm a dork, here is the view from our dining table inside...


A few notes about the project...

We saved part of the original deck for projects like this.  Then we started to imagine ourselves outside eating at the table.  The reclaimed wood was all grooved up and dirty/mossy it just felt disgusting.  We figured we'd have to spend hours sanding it so it didn't feel gross and then it would look just like the new stuff we already had left over.  So we compromised and decided on new stuff for the top because it feels SO much cleaner. 

Although we still used the reclaimed for the structure, we're going to seal it when we seal the top of the table.  Our plan is to do that when we seal the decking.  However, weeks of 90+ degrees in the forcast means that isn't happening anytime soon :( 
It is already more weathered than the newer stuff and looks trendy-rustic.  That is a term.  One that I just made up.

We built it so large because the deck is so freaking big.  Our existing table was a smaller, square table (2.5' x 2.5') and looked really small on the new deck.  Now we can seat 6 adults comfortably and easily get twice as many around the table if needed :)

I would estimate that it took about 6 hours to build give or take.  

Here's the budget breakdown...

$12 for more cedar.  Unfortunately, the reason we had the 2 longer pieces for the sides was because we couldn't use them on the deck because they were too warped/crooked.  We forgot about that until we tried to square the table and found it impossible.  So we had to go and buy another piece for the longer sides.  Which was very ironic because we had just returned a piece that would have done the job 2 days earlier...  

$7 for screws

$5 for shims/glue


So for less than $25 we've got a 3.5' x 8.5' outdoor dining table.  Score.


Thursday, June 21, 2012

The Master Bathroom Chronicles: Part 4 - All Done (for now)

Well, that went out with a whimper.  We just kind of finished what we wanted to do, took a look around and said, "well I'm glad the carpet is gone" and then moved outside to the deck.

But when I look back at the moving day photos (which is why I keep this blog), I see such improvement and am excited for it's future - it. is. glorious.

Here is what we did for our mini-makeover:

removed wallpaper
removed carpet
replaced floor with long-term temporary vinyl
painted the trim, cabinetry and doors
painted the room
gave the lights a little makeover
replaced hardware on cabinets
put up some hooks for towels
replaced toilet paper holder

I've pretty much chronicled the process here, here and here already, so I won't go into much more detail, except some before and afters.   It really is so much more comfortable in there without vertical striped wallpaper and carpet.  We can't wait until we've saved enough to hire pros to add heated flooring and move the fixtures around a bit for modern living (and storage).  But we are loving it, no more stinky, filthy and disgusting carpet.  Woot!


Vanity #1 BEFORE 


Vanity #1 AFTER


There are no words. 


A little better, no?

I still want to get something for the wall
above the toilet.  It just needs something.


Vanity #2 BEFORE


Vanity #2 AFTER


Yeah, not earth shattering, but a colossal improvement.  For now, I'll just dream of marble tile, adequate storage and heated flooring.


See, we now have somewhere for our towels! 


I like these lights so much better than the wallpapered ones 

So let's just cross this lovely bright room off the list for awhile and move forward to the master bedroom.  We've got a ton more work to do in there, but it's wallpaper free and painted.  And there are new!  improved!! window treatments.

Here is what we lived with for 9 months...


Smoke stained yellow wallpaper, shutters and 80's fabric FTW!!


And what we have now...


Like John said yesterday...

"It looks like someone lives here now"

indeed. 


Monday, June 18, 2012

Adding some curb swagg

So, it's Sunday - perfect day for a mailbox makeover!

This was a super simple project that took less than 20 minutes (not counting drying time for paint/stain) and makes a huge difference.

Let's just pretend that I actually took a photo of the mailbox before.  It was a standard green box atop a pressure treated post.  Something like this:


Imagine the green box instead of the black one and you've got it!

Anyhoo, I thought it looked a little sad and knew I could do better.

And then I did.


This angle is a little dark, so let's move to the other side, shall we? 


Yay!  It looks really classy now.

Big ups for easy projects.

The smudge is where I blurred out the address
somehow that felt like the thing to do...

All I did was use our nifty exterior stain to stain the pressure treated post (10 minutes) and spray painted the box (5 minutes).  Total cost:  $2 for the spray paint.

Yah, I know this isn't very exciting, but we still haven't built the arbor above the deck (didn't feel like spending the $$ and time this weekend) so there isn't a final post for the deck.

And as pathetic as this is, I haven't felt like cleaning the master bedroom enough to take photos for an after post there either.  That blue tub and yellow shower combo room takes a whole lot of motivation to clean since I hate it so much.  We'll have to have a party soon since that seems to be the only thing that motivates me to clean it :)

Maybe I'll just take photos around the shower room.  All artistic like.  Yeah, that's what I'll do.  It'll be good to cross that room off my "to blog about" list for awhile.  Plus, then I can tell you about our master bedroom, that's done now too.

Am I the only one who procrastinates cleaning something that I don't like?  I hope not, that would make me feel even worse... 


Tuesday, June 12, 2012

The DECK - Part 4: Stairs, wonderful stairs

It's the simple things I tell ya...

You know when you get used to not having something like - I don't know...stairs, and then all of a sudden - boom - you've got stairs it can be quite a shock.

Well consider me shocked to my core, because we now have stairs from our deck to our back patio.  I'll rewind a bit for you.  We moved in August of 2011 and knew the deck needed replacing but we could at least walk on the deck.  Not so much for the stairs, they were a dicey maneuver from day one.  And since we reset our patio in March, we haven't even had proper stairs, just a railroad tie (which was actually way more sturdy than the stairs we ripped out).  Ah, memories...


Railroad tie with some of the stair material nailed on top.

Classy.

But safer than the stairs that came with the house. 

Who knew stairs could be so complicated to build?  John.  I am so very naive about this stuff.  I figure just rip the old ones out and build new ones.  What?  2 hours tops in my book.  But John knew better.  Let's just say that the stairs took awhile, OK?  If I can ever get him to write a blog post, he can tell you himself, but since I rely on his word I'll just say that they were a challenge and we are extremely happy with the end result.

Here ya go...


First we had to rip the old stairs off the side of the house (the cat litter
bucket is sitting on them in the picture above).

And since the stairs were out of the way, we could
 finish the patio pavers all the way up to the house.
 

Then...


John used the old ledger board as a template for the new masonry screws and attached a new one.

This took FOR.EV.ER.  The masonry screws and expanders kept
malfunctioning and the board wasn't sitting tight.

John kept at it and finally the screws started to grab into the house.

John wins!!
  All kidding aside, this took a couple of hours.... 


Then he attached the stringers 


Then I stained the ledger board and stringers to match the skirting on the deck.

And right when we were ready to attach the stair treads, we realized that
there was no support for the corner since the patio doesn't go that
far underneath.

blerg.

John spent the next hour or so building support for the corner.
Then I stained that too. 

And finally...


Oh. My. God.

Who knew stairs could be such a luxury?


We kept going outside last evening to just look at them.   And walk up and down them.  And sit on them.  Did I mention they are extra wide?  They are,  14 1/2".  Nice and cosy to sit and have a beer in the evening.  I hope I can get used to them, I still hesitate when I get to them thinking that they are going to collapse if I step on them wrong.  


Here we are last fall...


...and here we are today.

Next (and FINAL) stage - the trellis.

See ya then.