Friday, March 23, 2012

Bring on the April showers!

Reality has sunk in friends.

I did a tiny little list of outdoor projects for this spring/summer here, and if you click over, you will see no mention of removing a crap load of railroad ties and installing a new retaining wall.  Honestly, it wasn't even on the radar until the weather was too nice not to tackle something ambitious.  But now we have to get to the stuff we actually planned on accomplishing.

Or do we?  We got an estimate on removing the trees (ash & pine) - $2600.  So yeah, those trees are living to see another day.  So cross that one off the list for this year.

Next up -- THE PATIO.

We figured that the work on the retaining wall should be done first so we have a level that we can work with since the spaces are adjacent.  That way we wouldn't reset the patio and then realize that we needed to install a ton more dirt - or worse - dig out a ton of dirt in order to have everything level with each other.  Now all we have to do is level the patio to the garden (much easier) and we're in business.

Yes, I know it.  I'm delusional.  I know we've done it backwards.  We'll live, I promise :)

So in the spirit of procrastination, I decided to paint the rain barrel.

BEFORE:


AFTER:


Cute, huh?  Since it goes on the north side of the house which doesn't see the sun I painted it a very bright green (it doesn't look that bright when it's set in it's final resting place).  Then I added some yellow and teal polka dots.  For fun.  We'll hook it up this weekend and can cross that one off the list.  Oh, wait.  It wasn't on a list.  

Let me get my list and add it on there so I can cross it off :)


Thursday, March 22, 2012

Kitten Update

I'm calling it.  I'm almost certain that they have mastered the litter box.  No new accidents for many weeks now.  They will never know that they were about 48 hours from eviction.  

And they have grown into regular outdoorsy cats.  Vera spends as much time as she can outdoors chasing anything that moves - real and imaginary - and has already fallen off the deck.

Rick prefers to stay inside during the icky daylight hours (he's part vampire I suspect) and will only go outside when it is dark.  Dork.

My how they've grown...

See what I mean?  Dork.


She crashes hard.  

Aww.  Such sweet kitties.  


Tuesday, March 20, 2012

Whereas I use many, many cliches to document our laundry room reno

Let's go back in time to September - MUSIC INTERLUDE - do you remembah...


On and on baby!

Right, September.

We closed on the house in late August and moved in a week later so we could get a couple of projects done so life wasn't too disrupted for us.

Project #1 - The Laundry Room.

Some before shots...


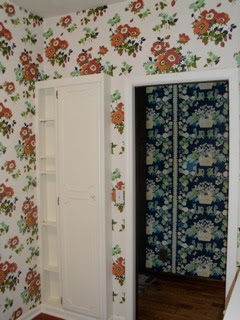
A cacophony of pattern


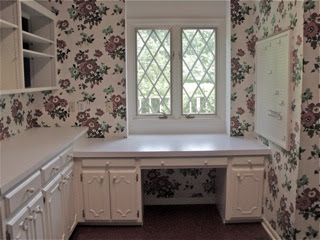
On the bright side, there is lots counter/cabinet space :)

What more can I say?  Nice how the ceiling
in the sink cove is wallpapered too -
really the extras mean so much.


Actually, if I was forced to keep one wallpapered room in the house, I'd have chosen this one.  Maybe since the background of the pattern was white, it didn't seem too claustrophobic.   Who knows?  

Here is what went down.  We had a lovely little party before we moved in.  We wanted all our friends and family to see the house before we got to work, just so they would understand why we no longer have free time or extra money.  I kid, really we wanted people to come over so they could bask in the beauty of what a professional decorator's advice in 1980 looked like - and because we like them.  

Sam invited a few of his friends over and before the party started I told them that if they wanted to try to remove some wallpaper, they were confined to the laundry room and laundry room only.  In the confusion and fun of the party I didn't realize that they took it as a challenge and went to town on the walls.  

Here is what 14 year olds don't know about removing wallpaper.  Everything.  It was a mess.  So our first project was most definitely the laundry.  It made perfect sense because we could get the wall behind the washer/dryer finished before we installed the machines and then never have to worry about moving them again.  So here we go...

I think the previous owner was concerned about moisture in rooms causing the wallpaper to separate from the wall.  In the basement bathroom there was a fair amount of Elmer's glue holding some seams in place.  Nothing like the laundry at all.  Every bit of paper that wasn't ripped off the walls by sugared up 14 year olds was adhered with Elmer's.  Side note, steamers don't work so well on Elmer's glue.  

So the wallpaper removal phase that was supposed to take a few hours took 2 days.  And left a huge mess of gouge marks and embedded glue on the walls.  We decided to skim coat the entire room before painting.  Another 2 days.  Sigh.


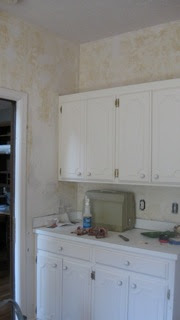
That glue isn't very scrubbable, it's Elmer's


Moving on...

We bought some lovely glass mosaic tile to put up between the counter and upper cabinets and around the sink.  Then we picked a color to coordinate (BM Woodlawn Blue).  Then we painted.  3 coats.  Ack.  The night before we moved we went and purchased the laundry machines, but didn't have time to install them.

Here is what happened next:

We moved.
We had to unpack.
We needed to get the kids to school and feed them.
Plus we got sweet little kittens, and this room is where their food and litter box live.

We hooked up the new! improved!! washer and dryer, and since the room was painted and looked fresher - we conveniently forgot about installing the glass tile and left the room as is until November. 

Fast forward selector...   

The weekend before we hosted Thanksgiving we thought we'd give it a shot.  It went very well and looks lovely.  Here are some tips about installing glass mosaic tile:

It's really easy.
Especially if you buy the stuff already on the mesh backing.  We actually didn't have to make cuts along the horizontal line and we were able to end reasonably close to the line we wanted to without having to make cuts along the vertical lines as well.

Don't get cocky and think that since it's easy, you can mix up all the mortar you need and it won't dry out before you're done.
We had a bit of an issue with the amount of tile we purchased not being enough and had a frantic round of "what if we did this" and phone calls to Lowe's before we had to punt and install the tile around the sink 5 courses shy of where the other tiles ended.  By this time the mortar had become a bit unworkable, but we didn't let that stop us, we made it work and got er done.

Mixed cliches aside, we really should have mixed up a new batch of mortar, I'm pretty sure we just got lucky and caught the very tail end of the life of the mortar.

Don't be scared of cutting the tile. 
This is what held us up for the longest time.  John the tile cutter had never cut glass tile and was unsure of how to start.  We just tried a glass cutting tool and it worked for us since we didn't have any complicated cuts.

Don't buy that crazy expensive stuff if you're only doing a small tile job.

Here is our homemade mortar and grout mixing attachment:


 And the homemade glass cutting jig:


They worked just fine for us and we spent $0 dollars.

Since this post is dragging on and on, I'll just post a few pictures.


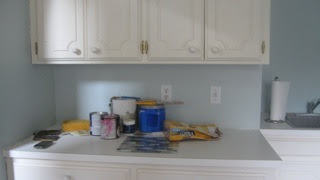
IN PROGRESS:  Painted, but not tiled.
This is how the room looked for a couple of months.  


IN PROGRESS:  Oops, some tiles slid!
NBD, I just popped them off and reset them with
some crazy glue.  And they are still there.


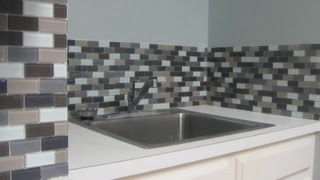
AFTER:  Not grouted yet, but very pretty.
Notice my trick photog skills, you can't tell that the tile
on the left is 5 courses higher than the tile around the sink.
Or maybe you can?  Don't tell me.


A note about grouting,  it is super easy, just do it.  It's a hassle, but so worth it in the end.

And now, the after photos...


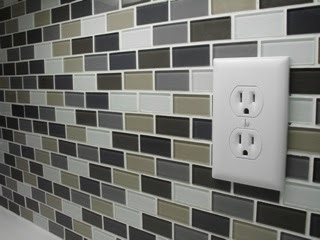
AFTER:  All grouted and shiny
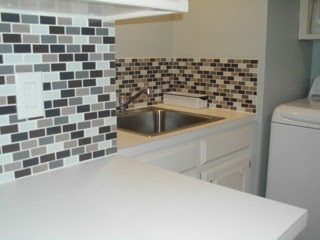
AFTER:  Lookin' good 


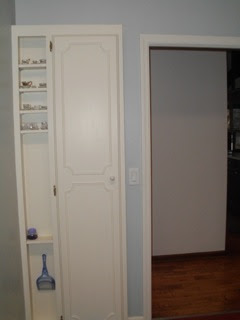
AFTER:  I still need a curtain.

 But for now it's nice to see Spring happening :)


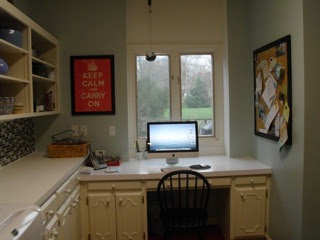
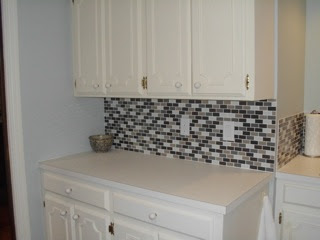
AFTER:  I really don't know what to do with all this counter space


BEFORE:  One last time - I promise 


AFTER:  Much calmer, don't you think?

Still to do:

Sew a curtain (can't decide between something natural like burlap or some kicky fabric)
Contain the mess o'cords that connect our lives to the outside (phone/internet)
Install a shelf above the sink to hide the fact that the tile doesn't match up height-wise


Monday, March 19, 2012

Spring Break! Woo!!

We were given a gift this week.  Wonderful, fantastic, magnificent weather.  Our original plan was to settle on a master bedroom color, paint and start decorating the room.  Instead we knocked down an exterior fence, dug up some 30 year old railroad ties and built a new retaining wall.  Whew.

Here is the story in pictures:


What it looked like last fall


Contemplation.

This whole project was spearheaded by the kids' refusal
*cough William cough*
to eat a yummy pizza that we had ordered for Spring Break!  Woo!! dinner.

John was a little cheesed off, so he went outside and kicked the fence down.


I kid.

He really wasn't that mad.  But it took less than a minute (48 seconds) to kick the fence down.

Apparently they didn't pour concrete foundations for the posts.

Our lucky day I suppose....


Phase one.  Which was all we were going to do this spring.

We decided to build a new! improved!! retaining wall and take up the
30 year old railroad ties which were rotting away anyway.

We weren't going to round the corner this spring,
we thought we could livewith it this summer and possibly do it this fall.

But then the weather was perfect for outdoor projects, so...


... we rounded the corner and decided to knock this section out as well.  


Not even kidding, this photo is nearly the exact angle as the one above.
That's what the wall above looked like this last fall


Here is a closeup of the rotting railroad ties.  The rot
did not make them any easier to remove.

Not. One. Bit.


Only 2 more levels of railroad ties to go!!


Now, I'll skip to the good part.  Because how many pictures of John, Sam or I swinging various implements (sledgehammers, chainsaws and axes OH MY!!) to hack away at some railroad ties can you look at?  Seriously, those were AWFUL.  I suppose they were properly installed with 3 foot long spikes holding them steady.  But so many of them were rotted with weeds growing through them we just bit the bullet and moved forward.  

But seriously, it sucked removing them.  I can not stress enough how bad it sucked.  Trust me, it did.

Moving on...


Yay!! Almost done :)
And now, the big reveal...

BEFORE

Seriously.  This is the same spot.  Seriously.


AFTER

Ahh.  All done :)

We can't plant anything for another 5 or 6 weeks, but OMG it's awesome.

No more weeds or rotten railroad ties.


And another angle..

 BEFORE

annnnnddddd....


AFTER!!!

Here is the view from the deck.
The veg garden goes on the left, and cutting garden goes on the right.

We are thinking about building a nice fence to give us some privacy back there,
but will definitely not get to that anytime soon.

We're tired.  And happy.


So there you have Retaining Wall Adventures 2012.  The first installment.


Wednesday, March 7, 2012

The end of an era

Wallpaper.  It's been our nightmare from the beginning.  But no longer friends...

It's gone.  6 months and a couple of weeks have gone by since we moved and the day has come.  There is no more wallpaper in our house.  None.  I just have to strip the backing paper off the walls in the master bath and we will be an official wallpaper-free home.  It feels good.  So good.  Here is a run down and look back at the madness:

Ahh, the hallway...


another angle of the hallway paper


the basement hall and bathroom


The kitchen


What you don't really see in the photo above are the disparate patterns:

There is a vertical stripe paper in the kitchen.
Tiles with X pattern on the backsplash.
Window inserts with an X pattern.
Whatever the hell is going on with the hallway paper.
And judging by the amount of water rings on top of the cabinets, plants everywhere.  

I really don't understand how that could start your day off right.  But then again, I wasn't thinking about wallpaper in 1978 :)


the master bedroom


the master bath


the powder room
And... the laundry.  More pattern madness!!


As you can see, we've been busy.  The former owner's family were kind enough to leave behind the notebook that was kept when the building/design of the house originally took place.  I've looked back it it several times and can only imagine the agonizing decisions that were made as to which wallpaper to choose, or which doorknobs, etc...   But really, look above.  Who in decorator hell advised this woman to put those 2 patterns in adjacent spaces, WHO???  

No matter, it's gone now.  But I will share from the notebook the sheer volume of wallpaper we've removed.

All rolls are single rolls, apparently that's how they were sold in 1978...

HALLWAY:  33 rolls
KITCHEN:  8 rolls
MASTER BEDROOM:  24 rolls
MASTER BATH:  12 rolls
LAUNDRY:  10 rolls
POWDER ROOM:  9 rolls
BASEMENT:  25 rolls

For those of you keeping score, that's 121 rolls of wallpaper (or 60 in today's double roll world).

What's next for us?  Paint, paint and more paint.

I'm still not 100% happy with the hallway color and since that was such a huge job, I've become a tad scared of making bold color decisions.  That's why our kitchen isn't painted yet.  Or why we painted the basement hallway a nice soft grey (I'll take some after photos and post soon).

The amount of wall space is still very shocking to me and I hate to waste time and money on a bad color decision.  So we've been painting everything very neutral.  Like primer white neutral.  It works for now.  Hopefully once we get used to living in a pattern-free home for awhile, then our brains can relax and get more inspired with color.

Next project unknown.  Possibles include:

painting the fiesta cantina
painting our master bedroom and bath
painting the kitchen
painting Will's room
or maybe, installing the gallery wall and lights in the hallway :)

TTFN