Let's just say that the reason I haven't done a post is because we're working on a light fixture hack and I'm not sure how it's going to pan out. I will soon, because those before and afters are pretty remarkable. On a budget too :)
So here's a quick one about bath hardware. Ugh. I've never understood the massive price increases in cabinet and bath hardware in the past few years. John blames:
1) Martha Stewart - and when I point out that Martha isn't really about home makeovers, more like homemaking
he then blames...
2) HGTV - and then quickly moves on to...
3) ...his favorite punching bag - Trading Spaces. The venom reserved for Trading Spaces (still!) is mighty, I tell you. But that's for another day.
Moving on...
We've done our budget friendly mini-makeover and we realize we still don't have anywhere to hang a towel. Bummer. We go shopping for bath hardware and are disgusted with the price and quality of what is available at your home improvement stores. Seriously, $10 for a toilet paper holder! And that's the cheapest one!! Unless you want to spend $50 for your toilet paper holder, then it looks moderately less cheap, but a little too fussy for our tastes. Sigh.
At this point I should add that I know that you can get a toilet paper holder for less than $10, I'm being dramatic, OK?
What to do?
A project in pictures...
BEFORE
STEP BY STEP
First, go to the plumbing parts section.
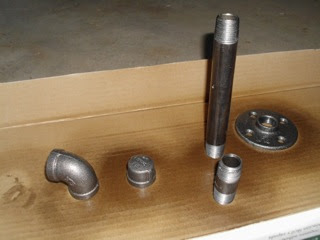
Buy these 5 items
-1/2" cap - 79 cents
-1/2" x 2" nipple (tee hee) - 49 cents
-1/2" 90 degree elbow - 77 cents
-1/2" x 6" nipple (tee hee) - $1.17
-1/2" floor flange - $1.49
total cost: $4.71 We bought black, I'm pretty sure galvanized would be cheaper and copper more expensive, so I'll leave that to you which finish to choose.
Clean them up. I used goo gone for the stickers, then some dish soap, and then just dried them off really well after that.
Spray with clear coat.
OK, go...
 |
Here they are, clean, clear coated and ready to go! |
 |
Attach the cap to the pipe. Attach the 2" nipple (tee hee) to the flange. |
 |
Attach the 90 degree elbow to the other end of the pipe. |
 |
Put them all together and, WHAT!, we've got ourselves a toilet paper holder!! |
 |
Here's what it looks like on the wall |
 |
And, here's what it looks like with toilet paper (and no flash). |
Done. Now, I realize that this toilet paper holder looks like plumbing pieces put together, but I prefer to think of it as industrial. Also, it doesn't threaten to come off the wall every time I change it. Bonus.
So there you have it, how $5 and 10 minutes (with some dry time for the clear coat added in) gets you a long-term temporary convenience.
Oh, and by the way. We bought 3 hooks to hang the towels on. So far they are working out quite nicely :)
Cross your fingers the light fixture hack goes well, here is a before shot to whet your whistle...
 |
See how the stripes on the wallpaper match up with the stripes glued onto the light fixture housing? That is some professional wallpapering friends. |
Don't be scared, the room looks a little different these days...

No comments:
Post a Comment