Showing posts with label master bath. Show all posts

Thursday, June 21, 2012

The Master Bathroom Chronicles: Part 4 - All Done (for now)

Well, that went out with a whimper.  We just kind of finished what we wanted to do, took a look around and said, "well I'm glad the carpet is gone" and then moved outside to the deck.

But when I look back at the moving day photos (which is why I keep this blog), I see such improvement and am excited for it's future - it. is. glorious.

Here is what we did for our mini-makeover:

removed wallpaper
removed carpet
replaced floor with long-term temporary vinyl
painted the trim, cabinetry and doors
painted the room
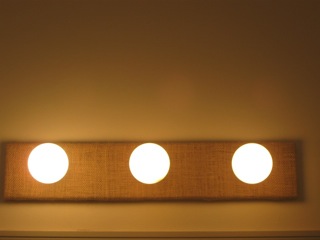
gave the lights a little makeover
replaced hardware on cabinets
put up some hooks for towels
replaced toilet paper holder

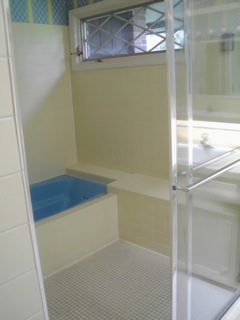
I've pretty much chronicled the process here, here and here already, so I won't go into much more detail, except some before and afters.   It really is so much more comfortable in there without vertical striped wallpaper and carpet.  We can't wait until we've saved enough to hire pros to add heated flooring and move the fixtures around a bit for modern living (and storage).  But we are loving it, no more stinky, filthy and disgusting carpet.  Woot!


Vanity #1 BEFORE 


Vanity #1 AFTER


There are no words. 


A little better, no?

I still want to get something for the wall
above the toilet.  It just needs something.


Vanity #2 BEFORE


Vanity #2 AFTER


Yeah, not earth shattering, but a colossal improvement.  For now, I'll just dream of marble tile, adequate storage and heated flooring.


See, we now have somewhere for our towels! 


I like these lights so much better than the wallpapered ones 

So let's just cross this lovely bright room off the list for awhile and move forward to the master bedroom.  We've got a ton more work to do in there, but it's wallpaper free and painted.  And there are new!  improved!! window treatments.

Here is what we lived with for 9 months...


Smoke stained yellow wallpaper, shutters and 80's fabric FTW!!


And what we have now...


Like John said yesterday...

"It looks like someone lives here now"

indeed. 


Saturday, May 26, 2012

The Master Bathroom Chronicles: Part 3 - Paint & Lighting

I've done it again.  Mixed my own paint color.  This started innocently enough.  You see, we've been buying paint by the 5 gallon bucket load around here.  Here's the catch.  It's from Wal-Mart.  Yup.  Did you know they sell 5 gallons of flat interior paint for $38?  Yup.  That's a little more than $7 a gallon for the math-challenged among you.  We use this paint for primer coats only though.  We don't have major patching projects or stains on the wall that primer would be a better option for, we just have walls that have been stripped of wallpaper and scrubbed clean.  The wallpaper installers did prime the walls before installation (thank goodness!), so we just slap another coat of flat interior paint right on top for a newer, fresher primer coat.

Well Wal-Mart must've figured us out because it seems that they are not stocking very much (if any) of their $38 buckets.  So this time we bought a $42 dollar bucket of "Country White" instead of the $38 "White".  So what, it's a primer coat right?  But when we got it up on the walls, it kind of looked nice with all of the yellow tile in the room, so we thought we were just going to put another coat of the Country White up and call it done.  But then I had to go and get fancy and paint the trim and cabinets white, and then even fancier and paint the trim around the mirrors a nice soft grey.  So the Country White no longer kind of looked nice, it looked sad and pathetic (I would even go as far to say it looked like some really cheap off white Wal-Mart color).  So we needed a new paint color...

No problem.  I just mixed some of the soft grey (a mistint form ACE) with the country white from Wal-Mart and a touch of white and voila - Anne #6.  There is absolutely nothing remarkable about this color.  It just looks really soft and nice and was free.  We have a full scale redo on the list for this room, so I saw no reason to obsess about paint since we were just doing mini makeover and wanted something fresher and lighter that didn't involve vertical striped wallpaper.

Last chance to see the wallpaper


We lived that nightmare for 8 and 1/2 months people!  Gah.  

Here is a little teaser of the after


Remember I took this picture and then dropped the camera?

So this is the only picture I have of the walls until
I can clean up the bathroom a bit.


Anyhoo, on to the lighting...

We had the hollywood vanity lights (which were wallpapered, natch) that we hated.  We took them down and tried to spray paint them so they would blend into and/or compliment the wall.  But, we didn't strip all the glue residue off of them first and it looked horrendous.  So, I spent ONE HOUR scrubbing the glue residue off of the lights and it wasn't until 59 MINUTES into that hour that I had the brilliant idea of covering the face plate portion of the light that was previously wallpapered, and then spray painted, and then scrubbed clean - with fabric.  Therefore I spent ONE HOUR scrubbing something that I was going to turn around and RECOVER with fabric.  Waste. Of. Time.  

Moving on....

We decided on burlap because it's cheap and easy.  Here's how I covered the lights.  Which, by the way, only took about 20 MINUTES for all 3 lights.


The naked light, the cover was being scrubbed clean at that point, I believe :)

Also, notice the wall paint and mirror trim.  It's different!

Also, notice the clutter in the mirror.


Here is how easy this was.

I bought the burlap (this took the longest)
I cut the burlap to size.
Then, I used spray adhesive to stick it to the faceplate.
Then I cut out the circles so the lightbulbs would fit through.
Done. 


AFTER:  Not earth-shattering, but better.


AFTER:  Because I know that you wanted to know what the
light looks like when it's turned on... 

The entire project cost $4.50 for the paint and burlap.  Oh, and an hour and 20 minutes of my time not counting the trip to the store to purchase the burlap.  

I figure this is way better than buying 3 cheap, temporary vanity lights that we'd hate and kick ourselves daily for spending the money.  Mission accomplished.

Next up, before and afters...


Wednesday, May 9, 2012

Master Bathroom Chronicles: Part 2 - The Floor

So we got rid of the carpet (Yay!), but needed a floor.

The long range plan includes radiant heat so we didn't want to go the peel and stick tile route because we didn't want to have to unstick those tiles at a later date.  Which, by the way, sucks ass.   The glue factor also eliminated a vinyl floor too, so what options did we have?

Off to the trifecta (Menards, Home Depot & Lowe's).  We know that click and lock floating floors are a big mistake in bathrooms (think moisture), but were willing to go that route because we didn't want to spend too much money on this and we didn't want to glue anything down.

Then we found the solution at Lowe's.  Vinyl flooring that adheres to itself and not the floor!!

Look:


 See the adhesive strip to the right of the flooring?
It sticks to the back of the next tile you put down.

So basically the floor is one, big, glued together (but not glued to the floor) piece of plastic-ish vinyl.  And we love it.  It is recommended for use in high moisture areas - BONUS.

Action shots:


We enlisted Will to peel the backing paper off the tiles.
It went much faster that way.
Not really, but we wanted him to help.  


Look how easy this is.  John used a utility knife to make the cuts.
We didn't have a lot of swearing or mistakes, so I'm going to
assume that part was relatively easy :) 


Staggered seams.   

So we thought it would take a couple of hours, but forgot about cuts around the shower and vanities and toilet, so it took a little more than 3 hours.  But we took breaks for lunch and running kids around, so it probably could be done in 2 if you have experience with making cuts with a utility knife.

A couple of notes:

we didn't pull the toilet, we just laid the floor right up to it

mistake?  hopefully not, if all goes to plan, this floor will be gone in 2 or so years

make sure to stagger the seams so it looks (kinda) like a wood floor

Wow, really that's all there was to it.  Kind of unbelievable really.  We lived with and hated the white carpet in the bathroom for 8 months and then one day we decide we can't stand it any longer and within 1/2 a day, the carpet is gone and we have a new! improved!! floor.  Kind of love it when something you think is going to be a huge problem turns out to be not so huge.  

Cost breakdown:

We bought 4 boxes at about $23 each at Lowe's, and ended up returning one box.  So this entire floor cost us about $70.  Woo to the Hoo.

Before, during and afters...

BEFORE

So sad.

That is the cleanest that carpet ever looked. 

LAST CHANCE TO ENJOY THE CARPET

Still very sad.
At least the wallpaper is gone,
so things are looking better.

Please notice how gross the carpet looks.

DURING


Even more sad, look at the wonky trim (removed for the flooring install)
and
It appears that the subfloor has been patched at one point, awesome. 


AFTER


And done.

Still sad though.

Poor little squatty toilet, it needs some company back in it's lonely corner. 


More action shots:


I'd have some more pictures to share, but right after I took the picture above, I dropped the camera.  Now the camera is broken.  

I am fully aware of the irony of removing plushy carpet which most certainly would have cushioned the fall and protected the camera and replacing it with a not-so-plush vinyl product which did nothing to protect the camera from it's fate.  

I call this Mary Ellen's revenge.  

Mary Ellen was the lovely lady who built the home over 30 years ago and made all of the design decisions.  Occasionally when I remove something particularly hideous and pat myself on the back about it, Mary Ellen comes back from beyond and kicks me in the ass.

I'm still beyond happy with the floor and am willing to sacrifice a camera for the cause.  My only hope is that one day, Mary Ellen and I will come to terms with each other and be able to live in harmony.  

Next up, part 3.  Paint and lighting


Sunday, May 6, 2012

Master Bathroom Chronicles: Part 1 - The List

We really needed Bath Crashers.  I'm pretty sure the "crashers" don't come around these parts, so we had to tackle the master bath on our own.  This is the mini-makeover on the cheap before we demo the whole thing and start from the ground up, with professionals doing the bulk of the work.  But we need to save our pennies so it gets done the right way the first time - ok the first and 1/2 time - I'm only counting this work we did as 1/2 of a makeover since it was really half-assed.

What we started with.  My god.  There are no words.


Such a sad, lonely little toilet... 


Vanity #1


The area with small tiles is the shower.  There are towel
bars on the doors too,  only one on the outside of the shower.

And you can see the blue tub. 


Vanity #2.  Fancy huh? 

There are so many positives to the space that it feels kind of selfish to point out the negatives, but that has never stopped me before, so here goes a free association center-justified list...

carpet, in a bathroom.  no.

30 year old carpet to boot.

30 years of bathroom stuff happening on the carpet, 

29.5 of the years not our bathroom stuff

wallpaper, of course 

fussy, fussy, fussy cabinet hardware and...

...towel (singular) bar.  Yup - only one place to hang a towel, unless you count the
wall by vanity #1, but that was really only big enough to hold a hand towel, 
not a bath towel.  Plus, we need space for 2 bath towels.

the saddest, loneliest, low to the ground, 20 gallon flush toilet.
Probably not 20 gallons, but at least 5 per flush, that tank is HUGE.

Yellow, 4" tile everywhere.  Including the shower/tub "room" and vanity countertops

tiled vanity countertops

but, for some reason, a blue whirlpool tub...

...which takes at least 20 gallons of water to reach the bottom of the jets so it functions as a whirlpool tub, plus it's blue.  And the drain doesn't stay closed unless you prop it that way with a paper clip.

and the jets are a little too powerful for relaxation.

and it's a flimsy fiberglass that I think may crack someday

As previously mentioned, the shower and tub are in their own little "room".  

Not a tub/shower combo where you stand in the tub to take a shower.  

They are separate, but behind shower doors in their own space.

  Yup, so every time we take a shower, water splashes into the tub.  

So I spend time cleaning an ugly blue tub that never gets used.

can you tell I hate my bathtub?

ugly trim on the painted cabinets

vanity makeup area that is too small to sit underneath on the bench provided, 
so you bang your knees when you move.  Unless you get a new bench, which we're not.

Also, it's too far away from the ginormous mirrors to get a good look at what you're doing.

ginormous mirrors.

inadequate bath fan which allows steam to rise into the skylight area and create mildew.


Enough of the Debbie Downer junk, gee whiz.  What we do have is a large sized master bath.  When we do it up right, it will be spectacular.  I promise.  

But for now we just had to get rid of some stuff for our own sanity and, I'm afraid, our health.

the carpet (health)

wallpaper (sanity)

The wallpaper came down with the Master Bedroom paper, it was a chore, but it was the last of the wallpaper in the house, so the end was in sight.  That leads us to...

...Part 2 - The Floor.